Behind the scenes of “Thrive”
- Chelsey Tucker
- Feb 28, 2020
- 2 min read
I don’t know if y’all enjoy the “behind the scenes” posts or not, but I thought I’d give a little background on my most recent piece, “Thrive”. Y’all let me know if you enjoy reading about my process! Because it’s quite a process. 😉
This piece wasn’t easy for me to complete, but I think the challenge of painting it helped me realize a few things.
1. I’m capable of more than I give myself credit for.
2. I need to take a chill pill. Everything always works out in the end.
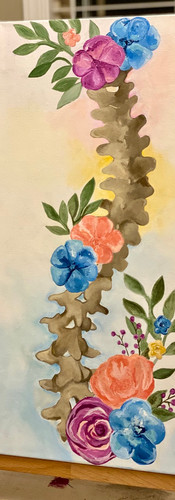
I knew in the beginning I wanted to sketch out an anatomically correct spine and go from there. My client requested flowers and greenery to be placed around the spine, so I was sure to keep that in mind as well.
Once the spine was sketched, I finger painted the background to make it appear to resemble watercolor. I used acrylic paint, a spray bottle of water (on the mist setting) and my fingers to achieve this look.
I then decided on placement of the flowers and sketched those on to the canvas and began to outline and fill them in with white paint. FYI- The thin coat of white paint dries slightly raised, so I’m able to feel where to put the details of the flowers!
Side Note: If you’re wondering why the spine was painted black and white in the beginning, it’s because my eyes pick up on black/white tones far better than shades of brown. I was able to go back in with my brown tones once I knew what colors needed to go where.
I loved the way it turned out in the end and I truly appreciated the challenge. Visually impaired or not, I’ve still got PLENTY of room left to learn new things and expand my creativity!